Key takeaways
- Buying by name alone: Viper Wired, Viper 8KHz, and Viper Ultimate feet may have different outlines.
- Using a metal blade: A razor can scratch the shell, cut your hand, or remove plastic from the skate recess.
- Skipping surface preparation: Old adhesive and dust prevent a flat bond.
- Applying excessive heat: High temperatures can warp plastic or soften nearby components.
- Touching the adhesive: Finger oils reduce adhesion and attract dust.
- Trimming a poor fit: A mismatched foot is not made compatible by cutting its edge.
- Using the mouse immediately: Fresh adhesive needs time to settle.
- Installing a sensor ring incorrectly: Keep the ring centered and clear of the sensor window.
Replacing worn mouse skates can restore smooth, predictable movement to a Razer Viper, but only if the new feet sit perfectly flat. A crooked edge can catch on the mouse pad, while leftover adhesive can create a wobble that makes aiming feel worse than it did before. Too much heat may soften the shell, and using a metal tool can gouge the base or damage the sensor opening. The process is straightforward, but patience matters more than force. This guide explains how to replace Razer Viper mouse skates properly on compatible wired and wireless models in 2026.
What You Need
| Item | Why | Optional? |
|---|---|---|
| Correct replacement skates | Use feet shaped for your exact Viper version. A set labeled for the Viper 8KHz or Viper Wired is not automatically correct for the Viper Ultimate. | No |
| Plastic pry tool or guitar pick | Lifts the old feet without scratching the mouse shell or gouging screw covers. | No |
| 70% to 99% isopropyl alcohol | Breaks down adhesive residue and cleans skin oils from the base. | No |
| Lint-free cloth or cotton swabs | Wipes away residue without leaving fibers under the new skates. | No |
| Plastic card or adhesive scraper | Helps remove stubborn adhesive after the old feet are lifted. | Optional |
| Hair dryer | Low, gentle heat can loosen old adhesive. It is safer than a heat gun when used briefly. | Optional |
| Small Phillips screwdriver | Some Viper models have screws concealed beneath skate sections. Use the correct size to prevent stripped heads. | Usually |
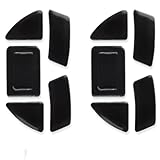
Two commonly listed replacement options are the 2Sets Mouse Feet Pads Skates Compatible for Razer Viper 8KHz Gaming Mouse, for Razer Viper Wired, priced at $6.99, and the 2Sets Mouse Feet Pads Skates Compatible for Razer Viper Ultimate Cyberpunk 2077 LPL Gaming Mouse, also priced at $6.99. Confirm the model name, foot shape, and included pieces before opening the package. “Viper” is a product family, not one universal bottom design.
As an Amazon Associate we earn from qualifying purchases at no extra cost to you. Product prices and availability are accurate as of the date shown and are subject to change.

Step-by-Step
1. Identify the exact mouse and inspect the replacement set — 3 to 5 minutes
Turn the mouse over and record the exact model printed on its label or packaging. Check whether it is a Viper Wired, Viper 8KHz, Viper Ultimate, or another Viper variant. Compare the new feet with the old ones while they are still installed. Look for matching curves, screw-cover cutouts, sensor-ring dimensions, and front and rear shapes.
Do not assume every piece in a kit belongs on the outside edge. Some kits include a sensor ring, while others include only the larger glide feet. If a replacement does not match precisely, stop and exchange it rather than trimming it with scissors. An unevenly cut skate can create drag and expose adhesive.
2. Prepare the workspace and mouse — 2 minutes
Work on a clean, flat table with good lighting. Wash and dry your hands, disconnect the mouse, and turn off the Viper Ultimate if applicable. Remove the wireless receiver cable from the immediate work area. Place a soft cloth under the mouse so the shell does not slide or collect scratches.
Take a quick photo of the original foot layout. This is useful if the kit contains several similarly shaped pieces. Avoid working over carpet, where dust and static can become a problem.
3. Warm and lift the old skates — 5 to 10 minutes
If the old feet are firmly attached, warm one section at a time with a hair dryer on low for about 10 to 15 seconds from roughly 6 to 8 inches away. The plastic should feel mildly warm, never hot. Do not use a heat gun, open flame, or concentrated high heat.
Slide a plastic pry tool under an outer corner of the skate. Work slowly around the perimeter and keep the tool shallow. Lift the foot in one piece if possible. If a foot tears, remove the remaining fragments before moving on. Never pry directly against the optical sensor, encoder openings, or thin shell edges.
If screws are hidden under a foot, remove the skate carefully enough to expose the screw head, then use the correct Phillips screwdriver. Keep screws in a small container and do not press down hard enough to deform the base.
4. Remove every trace of old adhesive — 5 to 15 minutes
Peel away the remaining foam or adhesive with a plastic card. Apply a small amount of isopropyl alcohol to a cotton swab or lint-free cloth; do not pour alcohol directly into the mouse. Rub the mounting surface until it feels smooth and looks free of shiny patches, foam, dust, and lint.
Allow the area to dry completely. This usually takes a few minutes, depending on how much alcohol was used. Inspect the base from several angles. Even a thin ridge beneath one corner can make the mouse rock or change its glide angle.
5. Test-fit the new skates — 3 to 5 minutes
Do not remove the protective film yet. Place each new foot over its matching location and check the alignment. The skate should sit inside the molded recess or follow the original outline without covering screw heads, vents, or the sensor opening.
Check that the front and rear feet are at the same height. If your kit includes a sensor ring, compare its inside diameter with the opening before installing it. The ring must not intrude into the sensor window. If the shape is wrong, stop and verify compatibility.
6. Install the replacement feet — 5 to 8 minutes
Clean your fingers or use tweezers to handle the edges of the skates. Peel off the backing film without touching the adhesive. Align one end first, then lower the rest gradually. Avoid stretching, folding, or repositioning the skate after it contacts the shell.
Press around the complete perimeter with a clean fingertip or the flat side of a plastic tool. Apply steady pressure for about 20 to 30 seconds per foot, especially at corners. Do not press over the sensor opening or scrape across the PTFE surface.
7. Let the adhesive settle and test the glide — 10 to 30 minutes
Leave the mouse stationary for at least 10 minutes before using it. For the most secure bond, wait 30 minutes if the room is cool or the adhesive was exposed during installation. Keep the mouse on a clean, hard surface rather than a dusty cloth.
On a clean mouse pad, move the Viper slowly in every direction. Check for catching, rocking, scraping, or unusual resistance. Confirm that the cursor tracks normally and that no skate overlaps the sensor opening. If one edge catches, stop using the mouse and correct the alignment rather than pressing harder.
Mistakes to Avoid
- Buying by name alone: Viper Wired, Viper 8KHz, and Viper Ultimate feet may have different outlines.
- Using a metal blade: A razor can scratch the shell, cut your hand, or remove plastic from the skate recess.
- Skipping surface preparation: Old adhesive and dust prevent a flat bond.
- Applying excessive heat: High temperatures can warp plastic or soften nearby components.
- Touching the adhesive: Finger oils reduce adhesion and attract dust.
- Trimming a poor fit: A mismatched foot is not made compatible by cutting its edge.
- Using the mouse immediately: Fresh adhesive needs time to settle.
- Installing a sensor ring incorrectly: Keep the ring centered and clear of the sensor window.
How Often
Replace Viper skates when they feel rough, develop a deep groove, become visibly thin, or cause inconsistent movement. For many users, that may be every 6 to 18 months. Heavy daily use, abrasive fabric pads, dust, and frequent high-speed swipes can shorten that interval. Clean the mouse pad regularly and wipe the feet with a dry microfiber cloth; do not routinely soak them in alcohol.
When to Call a Pro or Replace
Consider professional help if a screw is stripped, the shell will not separate, the battery or cable is damaged, or the mouse develops tracking problems after installation. A repair technician can inspect the base without adding further damage.
Replacing the mouse may make more sense when it has double-clicking switches, a failing scroll wheel, battery swelling, damaged charging contacts, or a cracked shell. If the new feet are correctly installed but the mouse still rocks, the bottom shell may be warped. In that case, new skates alone will not solve the problem.
FAQ
Can I replace Razer Viper skates without opening the mouse?
Often, yes. Many feet can be lifted and replaced from the exterior. However, some models conceal screws beneath skate sections. Remove only the screws that are clearly exposed after the old foot is lifted, and do not force the shell apart.
Should I remove the center sensor ring?
Only remove it if it is worn or your replacement kit specifically includes a matching ring. If the existing ring is flat and undamaged, leaving it in place reduces the risk of contaminating or scratching the sensor area.
How long should new mouse skates break in?
They should glide immediately, although the adhesive may need 10 to 30 minutes to settle. The PTFE surface may feel slightly different for the first few hours as it contacts the mouse pad. It should not scrape, wobble, or catch.
What if the replacement skate is slightly too large?
Do not install it if it overlaps the shell edge, screw access, vents, or sensor opening. Verify the product variant and return it for the correct set. A precise fit is more important than a low price, even when replacement kits cost only about $7 to $15.