Key takeaways
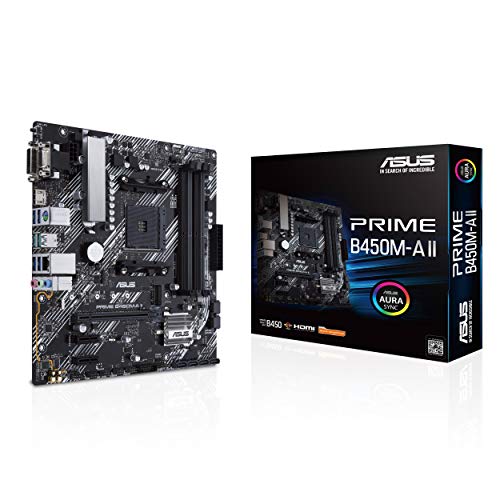
- New CPU support: Installing an Intel Core Ultra Series 2 chip on an ASRock B860M Pro A or ASRock B860 Pro A WiFi 6E often requires a BIOS from late 2025 or newer to POST correctly. AMD users moving a Ryzen 5000 CPU to an ASUS Prime B450M-A II need BIOS version 2409 or later.
- Memory stability and speed: Updates improve DDR5 compatibility at 7200+ MT/s and DDR4 at 4400 MT/s. If your XMP/EXPO profile fails to boot, a newer BIOS with an updated AGESA or Intel ME firmware often fixes it.
- Bug fixes and security: Patches for TPM, Secure Boot, and microcode vulnerabilities are delivered through BIOS updates. If you use a discrete module like the Anu Limen TPM 1.2 Security Module, its functionality depends on correct BIOS TPM/SPI settings.
- Feature additions: Resizable BAR, new PCIe 5.0 bifurcation options, and improved fan curve controls are frequently added post-launch.
Updating your motherboard BIOS in 2026 is the fastest way to add CPU support, fix stability bugs, and unlock memory performance without buying new hardware. Modern boards make it far safer than it used to be, but one interrupted flash can still brick a board, so the process deserves a careful, step-by-step approach.
In this guide, you’ll learn exactly when to update, what to prepare, and how to flash using both the in-BIOS method and the USB BIOS Flashback button. Whether you are on a new Intel LGA1851 build or keeping an AM4 system alive for another GPU generation, these steps apply to nearly every gaming motherboard today.
Our top picks




As an Amazon Associate we earn from qualifying purchases at no extra cost to you. Ratings are shown as listed on Amazon.
⚡ Save on Your Next PC — Amazon Prime
Prime members get fast free shipping on the systems above, plus early access to Prime Day & Black Friday PC deals. New members get a 30-day free trial.
Watch: How to Update Your Motherboard BIOS — Video Review
1. Do You Actually Need a BIOS Update?
Don’t update just because a newer version exists. Update when it solves a specific problem or enables something you need. In 2026, the most common reasons for gamers are:
- New CPU support: Installing an Intel Core Ultra Series 2 chip on an ASRock B860M Pro A or ASRock B860 Pro A WiFi 6E often requires a BIOS from late 2025 or newer to POST correctly. AMD users moving a Ryzen 5000 CPU to an ASUS Prime B450M-A II need BIOS version 2409 or later.
- Memory stability and speed: Updates improve DDR5 compatibility at 7200+ MT/s and DDR4 at 4400 MT/s. If your XMP/EXPO profile fails to boot, a newer BIOS with an updated AGESA or Intel ME firmware often fixes it.
- Bug fixes and security: Patches for TPM, Secure Boot, and microcode vulnerabilities are delivered through BIOS updates. If you use a discrete module like the Anu Limen TPM 1.2 Security Module, its functionality depends on correct BIOS TPM/SPI settings.
- Feature additions: Resizable BAR, new PCIe 5.0 bifurcation options, and improved fan curve controls are frequently added post-launch.
If your system is stable and you aren’t changing hardware, you can skip it. If you are building new, always flash to the latest stable release before installing Windows.
2. What to Prepare Before You Flash
Preparation prevents 90 percent of failures. Do this before you download anything.
- Identify your exact model and current BIOS: Check the box and the silkscreen on the board itself. An ASUS TUF Gaming B550-PLUS WiFi II is not the same as a non-WiFi B550-PLUS. In Windows press Win+R, type msinfo32, and note BIOS Version/Date. Or check on the BIOS main screen.
- Use a reliable USB drive: Use a USB 2.0 drive, 8GB to 32GB, formatted to FAT32 with MBR partition scheme. NTFS and exFAT will not be recognized by most flash utilities. Use a rear motherboard USB port, not a front case port.
- Provide stable power: For desktops, plug into a wall outlet or UPS. Do not flash during a thunderstorm. For laptops, have AC connected and battery above 50 percent. A power loss for even 2 seconds mid-flash can corrupt the chip.
- Download the correct file: Go only to the official support page for your board. Download the latest non-beta BIOS unless you need a specific beta for a new CPU. Unzip it and read the included notes. Some boards require a rename tool included in the zip.
- Back up and reset: Note your current settings, especially RAM frequency, voltage, and fan curves. Loading optimized defaults before flashing reduces variables. Save a profile to USB if your BIOS allows it.
3. Method 1: Update From Inside the BIOS (Recommended)
This is the standard method for systems that already POST and can enter setup. ASUS calls it EZ Flash 3, ASRock calls it Instant Flash, MSI calls it M-Flash. The steps are nearly identical.
- Format your USB drive to FAT32 and copy the extracted BIOS file to the root directory. For the ASRock B860M Pro A WiFi 6E, the file will be something like B860MPGW6_1.28. Keep the exact filename unless the manual tells you to run the renamer.
- Reboot, tap Del or F2 repeatedly to enter BIOS, and load Optimized Defaults. Save and re-enter BIOS.
- Open the flash tool: On the ASUS Prime B450M-A II go to Tool then ASUS EZ Flash 3 Utility. On ASRock boards go to Tool then Instant Flash. The tool will scan your USB drive and display the BIOS file.
- Select the file and confirm. Do not touch power, keyboard, or mouse. The progress bar will reach 100 percent, usually in 3 to 8 minutes. The system will reboot automatically. First boot after an update can take 30 to 90 seconds for memory training. This is normal.
4. Method 2: Update Without a CPU Using BIOS Flashback
Use Flashback when the board won’t POST with your new CPU, or you have no CPU installed at all. This is essential for pairing a new Intel Core Ultra or Ryzen 5000 with an older-stock board. All five gaming boards listed here support it: the ASRock B860M Pro A, ASRock B860 Pro A WiFi 6E, ASRock B860M Pro A WiFi 6E, ASUS TUF Gaming B550-PLUS WiFi II, and ASUS Prime B450M-A II.
- Prepare the USB drive as FAT32. Copy the BIOS file to the root and rename it exactly as the manual requires. ASUS typically requires B550P2.CAP or PB450M2.CAP and includes a BIOSRenamer.exe. ASRock requires creative.rom for most B860 boards.
- With the power supply switched on but the system powered off, insert the drive into the specific USB port marked BIOS or Flashback. It is usually the bottom USB 2.0 port near the Flashback button on the rear I/O.
- Press and hold the BIOS Flashback button for 3 seconds until the LED starts blinking. The board will power itself. Flashing takes 4 to 7 minutes. The LED will flash rapidly, then stop. Do not remove the drive or cut power until the LED is completely off.
- If the LED blinks 5 times and stays solid, the rename or format failed. Reformat to FAT32, re-rename, and try a different USB stick.
5. After the Flash: Verify and Reconfigure
A successful flash is not finished until you confirm and tune it.
- Verify version: Enter BIOS and check Main page or use msinfo32 in Windows. Confirm it matches the version you flashed, for example 3.10 or 3202.
- Load defaults, then re-enable settings: Load Optimized Defaults, save, re-enter BIOS, then enable XMP/EXPO, Resizable BAR, and your fan curves again. For DDR5 boards like the ASRock B860 Pro A WiFi 6E, test DDR5 6000 to 7200 first before trying 8000+.
- Re-enable security features: If you use BitLocker, TPM, or Secure Boot, re-enable TPM 2.0 / Intel PTT / AMD fTPM in the BIOS. If you use the Anu Limen TPM 1.2 Security Module on a legacy board, ensure Security Device Support is enabled under Trusted Computing.
- Test stability: Boot to Windows, run a 10-minute Cinebench or AIDA64 memory test, and play one demanding game. If you see WHEA errors or boot loops, clear CMOS and try one step lower on memory speed.
Tips
- Never flash from Windows software if a BIOS-based tool exists. In-BIOS and Flashback methods are more reliable and avoid antivirus or background process interference.
- Keep two USB drives: one small FAT32 drive dedicated to BIOS files, and another for everything else. Label it BIOS to avoid confusion.
- Save your stable BIOS profile to USB after you finish tuning. If a future update causes issues, you can reload settings in 10 seconds instead of re-entering them manually.
- Don’t daisy-chain updates. You can jump directly from a very old version to the latest stable version unless the release notes explicitly say an intermediate bridge BIOS is required.
Frequently Asked Questions
Will updating BIOS wipe my Windows install or games?
No. BIOS is separate from your SSD. Windows and all files remain. You will only need to re-enable XMP/EXPO, boot order, and fan profiles inside BIOS. If you use BitLocker, have your recovery key handy because TPM changes can trigger a recovery prompt on next boot.
How long does a BIOS update take and when should I panic?
In-BIOS flashing takes 3 to 8 minutes, Flashback takes 4 to 7 minutes. The screen may go black for 30 to 60 seconds and fans may spin to max. Only intervene if the Flashback LED or screen has been frozen for more than 15 minutes. Then power off, clear CMOS, and retry with a different USB drive.
Can I downgrade if the new BIOS is worse?
On most ASUS and ASRock gaming boards, yes, but not always. Some updates update the Intel Management Engine or AMD AGESA in a non-reversible way. The notes will say forward only or cannot downgrade. If downgrading is allowed, use the same EZ Flash or Instant Flash method with the older file.
Do I need to update BIOS for a new GPU?
Rarely. Most GPU upgrades need only a driver update. Update BIOS for a GPU only if you need Resizable BAR support, have PCIe 4.0/5.0 link issues, or the release notes list improved VGA compatibility. For a 2026 GPU on an ASUS TUF Gaming B550-PLUS WiFi II, enabling Resizable BAR in BIOS after updating can add 5 to 10 percent performance in some titles.
Conclusion
A BIOS update is routine maintenance in 2026, not a risky hack. Identify your exact board, use a FAT32 USB drive, flash via EZ Flash or Instant Flash when you can POST, and use BIOS Flashback when you can’t. Verify the new version, reload your XMP/EXPO and TPM settings, and stress-test for a few minutes. Done correctly, it takes under 15 minutes and leaves you with a more stable, compatible, and faster gaming PC.